Aubergine, Tomato and Ricotta Pasta

Saturday 28 April 2012


I sometimes feel like the aubergine gets a bad rap.  For years I always avoided it.  Recipes seemed over complicated and involved salting the aubergine to remove the bitter flavours before cooking.  This not only sounded unappealing but to someone like me who doesn’t really use salt in her cooking (gasp, I know) it seemed like a lot of unnecessary bother.  Once I finally tried cooking with aubergine I found that salting was totally unnecessary (in my experience).  I can honestly say in all the years I’ve been eating aubergines I’ve never tasted a bitter one.  Maybe I’ve been lucky.  My favourite way to cook aubergine is roasting.  I simply chop it up in to chunks and roast it in olive oil.  

For this pasta dish I added my roasted aubergine to the tomato, ricotta and basil pasta recipe I blogged about a few weeks ago.  It is a regular week night dinner in our house, especially as it’s so easy, great when you’ve had a long day at work.  Some pancetta mixed in works really well too.
Tomato, Ricotta and Basil Pasta Sauce Recipe slightly adapted from The Wednesday Chef featured on A Cup of Jo
Serves 2
1 x can plum tomatoes
Water as needed
3 tablespoons olive oil
1 clove of garlic
Handful of fresh basil plus extra to garnish
1 heaped tablespoon of ricotta cheese
Parmesan cheese
Your favourite gluten free pasta
To a large pan add the olive oil, garlic and plum tomatoes.  Bring to a boil and simmer gently for 30 – 40 minutes.  I usually add a bit of water if the sauce is becoming too dry.  I find the longer you leave it simmering the nicer the sauce.  In the meantime cook your pasta according to the pack instructions.  Once the sauce is ready add the basil reserving some to garnish.  Then add the ricotta and combine.  You can now mix in your roasted aubergine (see below) and pasta.  Serve immediately garnished with basil leaves and parmesan.
For the aubergine:
1 x aubergine chopped in to chunks
Olive oil for the baking tray
While I was making the sauce I tossed the chopped up aubergine in olive oil and baked in the oven on Gas Mark 6, 200°C.  Roast for about 30 - 40 minutes turning half way through cooking.  When it is ready simply add to the tomato sauce as above.


Pancakes with Raspberries and Toasted Coconut

Tuesday 24 April 2012

I’ve said this before but I luurve breakfast.  It really is my favourite meal of the day.  I literally wake up hungry.  I know there are plenty of people out there who don’t care for breakfast or simply can’t face food first thing.  I just don’t get it.  In fact when I made these pancakes I had to have some fruit and yoghurt first to stave off my early morning hunger.  I couldn’t patiently wait the half an hour it takes to prep and make these pancakes.  It was kind of like a starter and main course situation.  I used Phil Vickery’s pancake recipe as a base but made quite a few changes.  I used quite a bit of buckwheat flour which always works so well in pancakes.  I added a banana to the batter which introduced a slight banana flavour.  I changed the oil for coconut oil (one of my favourite healthy oils to work with) and reduced the amount of butter in the recipe.  These pancakes are fluffy and light with delicious chunks of banana.  The raspberries and toasted coconut are a great combination and maple syrup is in my opinion mandatory when it comes to pancakes.
 
Makes 8-10 pancakes/serves 2
70g (2 ½ oz) brown rice flour
50g (2 oz) buckwheat flour
½ teaspoon baking powder
Pinch of salt
1 medium egg
1 ½ tablespoons coconut oil melted
25g (1 oz) butter melted
284ml carton buttermilk
1 banana mashed
Toppings: Fresh raspberries, toasted coconut chips, maple syrup
Whizz the banana in a food processor or blender until a loose consistency or mash by hand.  Set aside.  In a bowl mix together the flours, baking powder and salt if using.  In a large measuring jug whisk together the egg, coconut oil, butter and buttermilk then add the banana.  Add the dry ingredients to the wet ingredients a bit at a time until well combined.  You should have a fairly thick batter.
Grease your skillet or non stick frying pan and place over a medium heat.  Spoon a table spoonful of batter per pancake in to the pan to create a small round pancake.  I could only fit three in my pan at a time.  Cook for 2-3 minutes on each side.  Once your pancakes are golden on each side remove to a plate and cover with foil to keep warm (I kept mine in a very low temperature oven).  Continue making more batches until all the batter is used up.  While you are making the pancakes toast some coconut chips on a baking tray in the oven for about ten minutes.  When you are ready to serve top your pancakes with the toasted coconut, raspberries and maple syrup.


Oatmeal Muffins

Wednesday 18 April 2012


Being a bit of a whole foods girl I am always attracted to words like oatmeal.  Strange I know but I love oats, porridge and anything associated with breakfast.  When I was first diagnosed with coeliac disease oats were a bit of grey area.  There weren’t certified gluten free oats around, you just had to try oats and see if you could tolerate them.  As a result I didn’t cook with them much seeking out other alternatives like rice flakes.  Happily this is no longer the case as gluten free oats seem to be everywhere and I am enjoying using them in lots of recipes.  This recipe comes from the popular blog  Gluten Free Girl and the Chef.  I have been following this blog for years.  This is a great place to start if you are following a gluten free diet.  You immediately feel at home. 

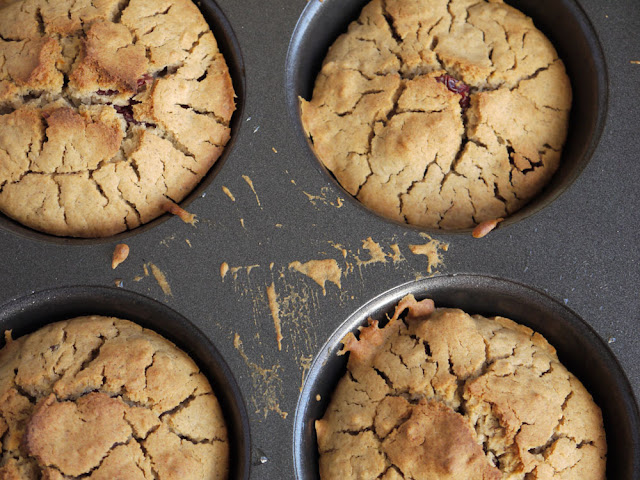
These muffins aren’t much to look at but the point is they are wholesome and filling which is just what breakfast should be about.  They are slightly moist but not too sweet like a regular muffin.  They were lovely warm from the oven with jam but also kept well making a good tea break snack at work for about four days if kept in an air tight container.

I followed the recipe with the following amendments.  For the flour I used equal parts buckwheat, quinoa and brown rice flour, for the sweetness I used maple syrup but I do think the suggested idea of jam would perhaps work better. I didn’t have psyllium husk so had to use linseed.  I used pecans rather than pistachios for the nuts.   I also made mine dairy free by using rice milk and coconut oil.  In spite of these adjustments the muffins still turned out really well and are so easy to make.
You can get the recipe here


Holiday at Home

Sunday 15 April 2012

Last week we both had time off work.  It was so good just to relax at home!
We took a day trip to Brighton.  Vintage shops and flea markets were explored.  Coffee was consumed.

Somebody ate a bacon sandwich...

But he needed the energy to lift heavy furniture back to the car.  We happened upon a wheel at the end of this road in Kemptown.

Lunches were improvised.

Rivers were traversed.

Hills were climbed and views were admired...sadly the bicycle had an owner...

Comforting lunches were eaten on chilly days.  Beef stew, roast potatoes and celeriac.

I organised my vintage plate collection.  Yes the cupboard door does need a new hinge...

I discovered that maple syrup, raspberries and toasted coconut are the answer to boring porridge oats.

Not a bad way to spend a week xx

Chicken and Parsnip Stew

Wednesday 11 April 2012


So what has happened to the weather?  One minute we were basking in gorgeous spring sunshine, the next, blustery rain, cold winds, grey skies.  I had to reach for my winter coat again when I was hoping oh so optimistically that we were through with each other for the time being.  Maybe I’m just suffering from coat boredom.  I’ve been wearing this thing for months...time for a change please!
The current bad weather has had me craving winter foods again.  This chicken stew has been a staple of our weekends all through the winter months.  I love it.  Parsnips are just about the best vegetable in the world in my opinion and although I love them roasted they work so well here.  As the stew cooks they break down and sweeten the stock.  Delicious and comforting.
These photos were taken a little hastily.  Thanks to the longer days and a burst of sunshine through the grey just as we were sitting down to dinner, I couldn’t resist the opportunity to snap this meal and share it with you.
Recipe adapted from BBC GoodFood
Serves 2
Olive oil
3-4 chicken thighs, skin removed
1 onion chopped
2-3 Parsnips peeled and chopped in to sticks
500ml Chicken stock*
½ teaspoon honey (I use manuka for the health kick)
Thyme leaves
Make up your chicken stock adding half a teaspoon of honey.  Oil a casserole dish and brown the chicken thighs.  Once they are golden set aside.  Add your onion to the same pan and cook for five minutes until soft and translucent.  Return the chicken to the pan and add the parsnips.  Sprinkle over the thyme leaves then pour in the chicken stock.  Cover and simmer.  *I usually use the full 500ml and let the stew simmer for 90 minutes but the chicken can be ready in 45-60 minutes so if you are cooking it for a shorter amount of time use less stock.  After 90 minutes of cooking the parsnips will be very soft and the chicken will fall away from the bone.  I usually lift the bones out at this stage breaking the chicken up with a spoon.  I also like to add some green veg to the pot about 5 minutes before the stew is ready to serve.  Here I used tenderstem broccoli but usually I use kale, spinach or frozen peas.  Adjust your cooking time accordingly.  Spinach and kale only need a couple of minutes to wilt.  Serve over brown rice and enjoy.

Chocolate and Coconut Chunks

Sunday 8 April 2012


First of all Happy Easter!  I bring you chocolate chunks...not eggs but still chocolate so that should count for something. 

I haven’t been able to blog for a couple of weeks thanks to my ageing lap top.  I needed to update my version of internet explorer but my laptop required all kinds of other software downloads first.  I tend to immediately whirl in to a state of panic if something goes wrong with my computer.  After a nerve racking couple of hours we finally got everything working yesterday.

Anyway back to these chocolate treats.  I made these a couple of weeks ago for a trip to the Isle of Wight to visit my Dad.  My Dad also happens to be coeliac and allergic to dairy products (we are a nightmare duo when it comes to going out for dinner) so since these were gluten free and vegan they were a definite winner.  I have to admit they didn’t all make it as far as the Isle of Wight, quite a few were consumed by my husband and I in the car and more were eaten on the ferry but we turned up with enough to share with my Dad.  These are a wholesome little treat that will have you reaching for more.


Recipe from Sprouted Kitchen 

100g (4oz) desiccated coconut

50g (2oz) cocoa powder

25g (1oz) gluten free rolled oats

½ cup maple syrup

¼ cup extra virgin coconut oil (melted)

½ teaspoon vanilla extract

¼ teaspoon cinnamon

Combine the coconut, cocoa powder and rolled oats in a mixing bowl.  Add the maple syrup, coconut oil, vanilla and cinnamon.  Mix everything well and then place the bowl in the fridge for twenty minutes.

Preheat the oven to gas mark 2, 140°C.  Line a baking sheet with parchment paper.  Remove your mixture from the fridge.  Use a spoon to scoop out 1 inch balls and place them on the parchment lined tray.  Bake them in the middle of the oven for twenty minutes.  Remove to a wire rack and cool.  The recipe gives the alternative option to chill these for an hour rather than baking them but I found that baking these gives them a lovely crunchy texture on the outside with a softer centre when you bite in to them.